
You can connect devices, such as cameras, speakers, or microphones to the XV Plus Gateway to enable analytics, AlarmVision, 2-Way Audio, and more.
For optimal performance, DMP recommends the total resolution of added devices not exceed each model limit (XV-24: 24 MP, XV-60: 60 MP, XV-96: 96 MP). All cameras should have a frame rate of 15 FPS or less and a codec: H.264. Performance may vary based on number of cameras, framerate, codec, and motion detection.
Add a Camera
Option 1: Use Auto-Discover
Cameras can be automatically discovered if they exist on the same subnet as the gateway.
-
Go to Customers, then select the System Name that the XV Gateway is connected to.
-
Go to Video, then select + Device to XV Gateway to add a camera to the XV Gateway.
-
Ensure Auto Discover Devices is ON. Cameras that already exist on the same subnet as the XV Gateway automatically display in the Cameras list.
-
In Cameras, locate the camera you want to add to the XV Gateway. Select Enable to add the camera to the XV Gateway.
-
Enter the default Username and Password for your camera or the username and password you set previously. Select Send. The camera view displays a preview of the field of view.
-
Once the camera has been added, select Close
Option 2: Manually Add a Camera
Cameras should be manually added when they are outside of the XV Gateway subnet.
-
Go to Customers, then select the System Name that the XV Gateway is connected to.
-
Go to Video, then select + Device to XV Gateway to manually add a camera to the XV Gateway.

-
Toggle Auto Discover Devices OFF or select Add Manually.


-
At Stream Type, select ONVIF or RTSP Stream from the drop-down menu and enter the camera’s IP Address. Select Add.
.png?cb=991f5170a93b34560c18a4007ccc9d35)
-
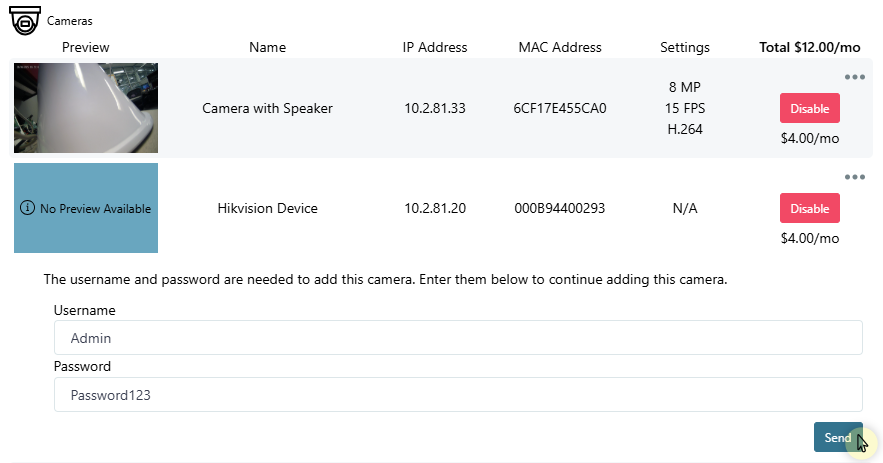
Enter the default Username and Password for your camera or the username and password you set previously. Select Send. The camera view displays a preview of the field of view.
-
Once you have added the camera to the XV Gateway, select Close.
.png?cb=d8a5bcd5830d003951de47bc09d07058)
Add an Audio Device
Option 1: Add an Existing Camera as an Audio Device
If a camera is already associated with the XV Gateway but also needs to be added as an audio device, follow the steps below:
-
Go to Customers, then select the System Name the XV Gateway and camera are connected to.
-
Go to Video, then select + Device to XV Gateway to add an existing camera as an audio device to the XV Gateway.
Unknown Attachment
-
Locate the camera you want to add as an audio device to the XV Gateway, then select the More icon. Select Add as Audio Device to add the camera as an audio device to the XV Gateway.
Unknown Attachment
-
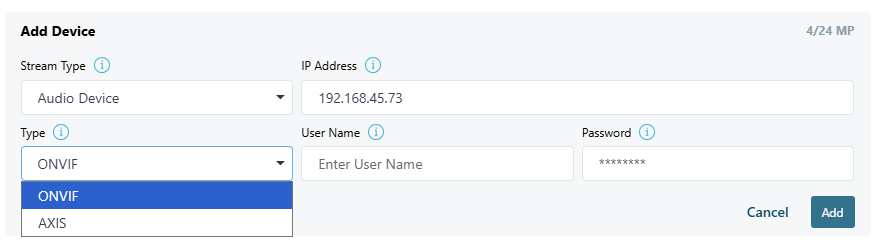
In the Stream Type drop-down menu, select Audio Device. The IP Address automatically displays.
-
In the Type drop-down menu, select ONVIF or AXIS as the audio device type.
-
Enter the default Username and Password for your camera or the username and password you set previously. Select Add.
-
Once the camera has been added as an audio device, select Close.
Unknown Attachment
Option 2: Add a New Audio Device Using Auto-Discover
If you are adding an external speaker to the XV Gateway using auto-discover, it initially displays as a camera. From the Cameras list, you can then add it as an audio device.
Note: Before adding an audio device, ensure Allow Camera Audio is enabled in the XV Gateway Settings. For more information, refer to Add 2-Way Audio Devices.
To add an audio device using auto-discover, complete the steps below:
-
Go to Customers, then select the System Name that the XV Gateway is connected to.
-
Go to Video, then select + Device to XV Gateway to add a device to the XV Gateway. Devices that already exist on the same subnet as the XV Gateway automatically display in the Camera list.
Unknown Attachment
-
Ensure Auto Discover Devices is ON. Devices that already exist on the same subnet as the XV Gateway automatically display in the Cameras list.
Unknown Attachment
-
In Cameras, locate the audio device you want to add to the XV Gateway. Select the More icon. Select Add as Audio Device to add the device as an audio device.
Unknown Attachment
Note: If Add as Audio Device does not appear, ensure Allow Camera Audio is enabled in the XV Gateway Settings. For more information, refer to Add 2-Way Audio Devices.
-
In the Stream Type drop-down menu, select Audio Device. The IP Address automatically displays.
-
In the Type drop-down menu, select ONVIF or AXIS as the audio device type.
-
Enter the default Username and Password for your camera or the username and password you set previously. Select Add.
-
Once the device displays as an audio device, select Close.
Unknown Attachment
Option 3: Manually Add an Audio Device
Audio devices that are not connected to the same subnet as the XV Gateway should be manually added.
To manually add an audio device, complete the steps below:
-
Go to Customers, then select the System Name that the XV Gateway is connected to.
-
Go to Video, then select + Device to XV Gateway to add a device to the XV Gateway.
Unknown Attachment
-
To manually add a device, toggle Auto Discover Devices OFF or select Add Manually.
-
In the Stream Type drop-down menu, select Audio Device. The IP Address automatically displays.
-
In the Type drop-down menu, select ONVIF or AXIS as the audio device type.
-
Enter the default Username and Password for your camera or the username and password you set previously. Select Add.
-
Once the device displays as an audio device, select Close.